안녕하세요 이번 주제는 바로 RxJava로 비동기 처리를 하여 Papago API를 호출하는 번역 앱을 만들기입니다
전체 코드는 이곳에서 확인할 수 있습니다
https://github.com/ParkSangSun1/RxAppExample
GitHub - ParkSangSun1/RxAppExample: RxJava + Papago API + MVVM + Hilt
RxJava + Papago API + MVVM + Hilt. Contribute to ParkSangSun1/RxAppExample development by creating an account on GitHub.
github.com
그럼 바로 시작하겠습니다! 우선 종속성부터 추가하겠습니다
Gradle Project 단위
buildscript {
    repositories {
        google()
        mavenCentral()
    }
    dependencies {
        classpath "com.android.tools.build:gradle:7.0.2"
        classpath "org.jetbrains.kotlin:kotlin-gradle-plugin:1.5.30"
        //추가
        classpath 'com.google.dagger:hilt-android-gradle-plugin:2.38.1'
    }
}

task clean(type: Delete) {
    delete rootProject.buildDir
}
Gradle Module 단위
plugins {
    id 'com.android.application'
    id 'kotlin-android'
    //추가
    id 'kotlin-kapt'
    id 'dagger.hilt.android.plugin'
}

android {
    compileSdk 31

    defaultConfig {
        applicationId "com.pss.rx_app_example"
        minSdk 21
        targetSdk 31
        versionCode 1
        versionName "1.0"

        testInstrumentationRunner "androidx.test.runner.AndroidJUnitRunner"
    }

    buildTypes {
        release {
            minifyEnabled false
            proguardFiles getDefaultProguardFile('proguard-android-optimize.txt'), 'proguard-rules.pro'
        }
    }
    compileOptions {
        sourceCompatibility JavaVersion.VERSION_1_8
        targetCompatibility JavaVersion.VERSION_1_8
    }
    kotlinOptions {
        jvmTarget = '1.8'
    }

    //추가
    buildFeatures {
        dataBinding true
    }
}

dependencies {

    implementation 'androidx.core:core-ktx:1.7.0'
    implementation 'androidx.appcompat:appcompat:1.4.0'
    implementation 'com.google.android.material:material:1.4.0'
    implementation 'androidx.constraintlayout:constraintlayout:2.1.2'
    testImplementation 'junit:junit:4.+'
    androidTestImplementation 'androidx.test.ext:junit:1.1.3'
    androidTestImplementation 'androidx.test.espresso:espresso-core:3.4.0'

    //by viewModel
    implementation 'androidx.activity:activity-ktx:1.4.0'
    implementation 'androidx.fragment:fragment-ktx:1.3.6'

    // dagger hilt
    implementation "com.google.dagger:hilt-android:2.38.1"
    kapt "com.google.dagger:hilt-android-compiler:2.38.1"

    // Retrofit
    implementation 'com.squareup.retrofit2:retrofit:2.9.0'
    implementation 'com.squareup.retrofit2:converter-gson:2.9.0'
    implementation 'com.squareup.retrofit2:adapter-rxjava3:2.9.0'

    //okHttp
    implementation 'com.squareup.okhttp3:okhttp:4.9.1'
    implementation 'com.squareup.okhttp3:logging-interceptor:4.9.1'

    //nav component
    implementation 'androidx.navigation:navigation-fragment-ktx:2.3.5'
    implementation 'androidx.navigation:navigation-ui-ktx:2.3.5'

    implementation "io.reactivex.rxjava3:rxjava:3.0.6"

    implementation 'io.reactivex.rxjava3:rxandroid:3.0.0'

    implementation "com.jakewharton.rxbinding3:rxbinding:3.1.0"

    implementation 'com.jakewharton.rxbinding3:rxbinding-core:3.1.0'
    implementation 'com.jakewharton.rxbinding3:rxbinding-appcompat:3.1.0'
    implementation 'com.jakewharton.rxbinding3:rxbinding-drawerlayout:3.1.0'
    implementation 'com.jakewharton.rxbinding3:rxbinding-leanback:3.1.0'
    implementation 'com.jakewharton.rxbinding3:rxbinding-recyclerview:3.1.0'
    implementation 'com.jakewharton.rxbinding3:rxbinding-slidingpanelayout:3.1.0'
    implementation 'com.jakewharton.rxbinding3:rxbinding-swiperefreshlayout:3.1.0'
    implementation 'com.jakewharton.rxbinding3:rxbinding-viewpager:3.1.0'
    implementation 'com.jakewharton.rxbinding3:rxbinding-viewpager2:3.1.0'
    implementation 'com.jakewharton.rxbinding3:rxbinding-material:3.1.0'

    implementation 'com.airbnb.android:lottie:5.0.3'
}
다 추가하셨다면 싱크 now를 눌러줍니다
Hilt 종속성을 추가할 때 오류가 난다면 다음에서 설명하는 순서대로 추가하고 sync now를 눌러주세요
//1. kapt plugin을 추가한다
id 'kotlin-kapt'
//2. 싱크
//3. 종속성 추가 (Module 단위)
implementation "com.google.dagger:hilt-android:2.38.1"
kapt "com.google.dagger:hilt-android-compiler:2.38.1"
//4. 싱크
//5. 종속성 추가 (Project 단위)
classpath 'com.google.dagger:hilt-android-gradle-plugin:2.38.1'
//6. 싱크
이제 다 추가하셨다면 XML을 이용해 화면을 구성해 봅시다
먼저 아래 로티 사이트로 들어가 원하는 파일을 json 형태로 다운로드해 줍니다
Free Lottie Animation Files, Tools & Plugins - LottieFiles
The world’s largest online platform for the world’s smallest animation format for designers, developers, and more. Access Lottie animation tools and plugins for Android, iOS, and Web.
lottiefiles.com

다운로드한 파일은 res 우클릭 -> New -> Android Resource Directory -> Resource type을 raw로 선택 후 생성해 줍니다
그리고 만들어진 파일 안에 다운로드한 json 파일을 넣어줍니다, 이제 MainActivity의 xml을 만들어 봅시다!
<?xml version="1.0" encoding="utf-8"?>
<layout xmlns:android="http://schemas.android.com/apk/res/android"
    xmlns:app="http://schemas.android.com/apk/res-auto"
    xmlns:tools="http://schemas.android.com/tools">

    <data>

    </data>

    <androidx.constraintlayout.widget.ConstraintLayout
        android:layout_width="match_parent"
        android:layout_height="match_parent"
        android:background="#FAFAFA"
        tools:context=".view.MainActivity">

        <com.airbnb.lottie.LottieAnimationView
            android:id="@+id/imageView"
            android:layout_width="200dp"
            android:layout_height="200dp"
            android:layout_marginTop="30dp"
            android:layout_gravity="center_horizontal"
            app:layout_constraintEnd_toEndOf="parent"
            app:layout_constraintStart_toStartOf="parent"
            app:layout_constraintTop_toTopOf="parent"
            app:lottie_autoPlay="true"
            app:lottie_loop="true"
            app:lottie_rawRes="@raw/translation" />

        <LinearLayout
            android:layout_width="match_parent"
            android:layout_height="wrap_content"
            android:layout_marginTop="40dp"
            android:orientation="vertical"
            android:padding="20dp"
            android:layout_marginStart="30dp"
            android:layout_marginEnd="30dp"
            android:elevation="5dp"
            android:background="@drawable/main_translation_frame"
            app:layout_constraintEnd_toEndOf="parent"
            app:layout_constraintStart_toStartOf="parent"
            app:layout_constraintTop_toBottomOf="@+id/imageView">

            <androidx.constraintlayout.widget.ConstraintLayout
                android:layout_width="match_parent"
                android:layout_height="wrap_content">

                <TextView
                    android:id="@+id/textView"
                    android:layout_width="0dp"
                    android:layout_height="wrap_content"
                    android:fontFamily="@font/notosanskr_bold"
                    android:includeFontPadding="false"
                    android:text="원문"
                    android:textColor="@color/black"
                    android:textSize="20sp"
                    app:layout_constraintBottom_toBottomOf="parent"
                    app:layout_constraintEnd_toStartOf="@+id/before_txt"
                    app:layout_constraintStart_toStartOf="parent"
                    app:layout_constraintTop_toTopOf="parent" />

                <TextView
                    android:id="@+id/before_txt"
                    android:layout_width="0dp"
                    android:layout_height="wrap_content"
                    android:fontFamily="@font/notosanskr_bold"
                    android:text="영어"
                    android:textColor="@color/gray"
                    android:textSize="15sp"
                    app:layout_constraintBottom_toBottomOf="@+id/change"
                    app:layout_constraintEnd_toStartOf="@+id/change"
                    app:layout_constraintTop_toTopOf="@+id/change" />

                <ImageView
                    android:id="@+id/change"
                    android:layout_width="30dp"
                    android:layout_height="30dp"
                    android:padding="5dp"
                    android:src="@drawable/arrow"
                    app:layout_constraintBottom_toBottomOf="parent"
                    app:layout_constraintEnd_toEndOf="parent"
                    app:layout_constraintTop_toTopOf="parent" />
            </androidx.constraintlayout.widget.ConstraintLayout>

            <EditText
                android:id="@+id/translation_edit_txt"
                android:layout_width="match_parent"
                android:layout_height="wrap_content"
                android:padding="5dp"
                android:background="@null"
                android:textSize="15sp"
                android:layout_marginTop="8dp"
                android:textColor="@color/gray"
                android:fontFamily="@font/notosanskr_medium"
                android:hint="번역할 내용을 입력하세요"
                android:includeFontPadding="false"
                app:layout_constraintBottom_toBottomOf="parent"
                app:layout_constraintTop_toTopOf="parent" />

            <androidx.constraintlayout.widget.ConstraintLayout
                android:layout_width="match_parent"
                android:layout_marginTop="15dp"
                android:layout_height="wrap_content">


                <TextView
                    android:id="@+id/textView3"
                    android:layout_width="0dp"
                    android:layout_height="wrap_content"
                    android:fontFamily="@font/notosanskr_bold"
                    android:includeFontPadding="false"
                    android:text="번역문"
                    android:textColor="@color/black"
                    android:textSize="20sp"

                    app:layout_constraintBottom_toBottomOf="parent"
                    app:layout_constraintEnd_toStartOf="@+id/after_txt"
                    app:layout_constraintStart_toStartOf="parent"
                    app:layout_constraintTop_toTopOf="parent" />

                <TextView
                    android:id="@+id/after_txt"
                    android:layout_width="0dp"
                    android:layout_height="wrap_content"
                    android:fontFamily="@font/notosanskr_bold"
                    android:text="한국어"
                    android:layout_marginEnd="28dp"
                    android:textColor="@color/gray"
                    android:textSize="15sp"
                    app:layout_constraintBottom_toBottomOf="parent"
                    app:layout_constraintEnd_toEndOf="parent"
                    app:layout_constraintTop_toTopOf="parent" />


            </androidx.constraintlayout.widget.ConstraintLayout>


            <TextView
                android:id="@+id/translation_after_text"
                android:layout_width="match_parent"
                android:layout_height="wrap_content"
                android:text="번역문이 표시됩니다"
                android:textColor="@color/gray"
                android:textSize="15sp"
                android:layout_marginTop="5dp"
                android:padding="5dp"
                android:fontFamily="@font/notosanskr_medium"
                android:includeFontPadding="false"
                />

            <androidx.appcompat.widget.AppCompatButton
                android:id="@+id/translation_btn"
                android:layout_width="wrap_content"
                android:layout_height="wrap_content"
                android:text="번역하기"
                android:fontFamily="@font/notosanskr_bold"
                android:includeFontPadding="false"
                android:textSize="15sp"
                android:textColor="@color/white"
                android:layout_marginTop="20dp"
                android:padding="15dp"
                android:background="@drawable/search_btn"
                android:layout_gravity="end"
                android:layout_marginBottom="10dp"
                app:layout_constraintBottom_toBottomOf="parent"
                app:layout_constraintEnd_toEndOf="parent"
                app:layout_constraintStart_toStartOf="parent" />

        </LinearLayout>

    </androidx.constraintlayout.widget.ConstraintLayout>
</layout>
BaseActivity를 추가해 줍니다
abstract class BaseActivity<T : ViewDataBinding>(@LayoutRes private val layoutResId: Int) :
    AppCompatActivity() {
    protected lateinit var binding: T
    private var waitTime = 0L

    override fun onCreate(savedInstanceState: Bundle?) {
        super.onCreate(savedInstanceState)
        binding = DataBindingUtil.setContentView(this, layoutResId)
        init()
    }

    abstract fun init()

    override fun onBackPressed() {
        if (System.currentTimeMillis() - waitTime >= 1500) {
            waitTime = System.currentTimeMillis()
            Toast.makeText(this, "뒤로가기 버튼을 한번 더 누르면 종료됩니다.", Toast.LENGTH_SHORT).show()
        } else finish()
    }

    protected fun shortShowToast(msg: String) =
        Toast.makeText(this, msg, Toast.LENGTH_SHORT).show()

    protected fun longShowToast(msg: String) =
        Toast.makeText(this, msg, Toast.LENGTH_LONG).show()
}
위에 BaseActivity는 MainActivity에 아래와 같이 적용할 수 있습니다
class MainActivity : BaseActivity<ActivityMainBinding>(R.layout.activity_main) {
	...
    ...
    ...
}
이제 만들어진 xml 화면을 확인해 봅시다
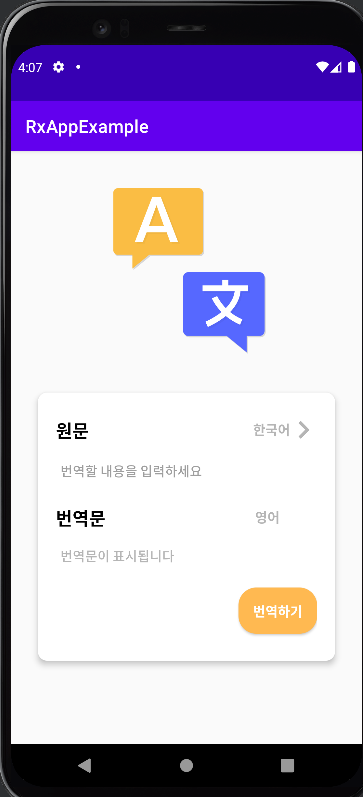
화면의 구성은 번역할 내용을 입력해 주세요라는 edittext안에 번역할 내용을 넣고 번역하기 버튼을 클릭하면 번역문에 번역문 한 문자가 표시됩니다, 추가로 원문 옆 번역할 나라 언어 옆에 화살표를 누르면 번역 문자가 바뀌게 됩니다
'Project example > 번역 앱' 카테고리의 다른 글
| [3. 값 보여주기] RxJava+MVVM+Hilt+Papago API를 이용한 번역 앱 만들기 (feat.Kotlin) (0) | 2022.04.15 |
|---|---|
| [2. API 호출, 모듈] RxJava+MVVM+Hilt+Papago API를 이용한 번역 앱 만들기 (feat.Kotlin) (0) | 2022.04.14 |

